With Automne you can manage your style sheets directly from the administration (for more information about style sheets consult the pre-requirements).
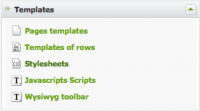
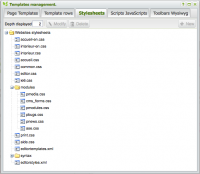
Style sheet management is accessible from the right-side panel; choose the “Templates” tab, then the “Style sheets” link
You will then have a list of your style sheets and directories stored in the CSS directory of Automne (/css).
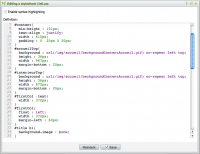
- Editing a sheet: select and click on “Modify”.
- Deleting a sheet: click on “Delete” after selecting a sheet. Make sure you no longer need the style sheet before deleting it in order to avoid damaging the design of your site.
In editing mode you can activate the syntax coloring (check box in the upper-left) in order to have visual guides while editing.
You will note in the list of sheets the presence of two separate files. They are both for the WYSIWYG toolbar that comes with Automne (FCK Editor).
editorstyles.xml defines the styles that will be accessible in the toolbar and applicable to the elements contained in the HTML editor. It is here that the styles bold green or bold pink, for example, must be defined.
Example :
<?xml version="1.0" encoding="iso-8859-1" ?>

<Styles>

<Style name="Custom Bold" element="span">

<Attribute name="style" value="font-weight: bold;" />

</Style>

</Styles>
n this page we define that the style “Custom Bold” can be applied to the element span and will be applied to the CSS font-weight property: bold.
Many other possibilities are offered; to know more consult the official help for the FCK editor.
editortemplates.xml defines the XHTML blocks that will be made available in the toolbar.
If you regularly input information with the same structure but variable data in a block of text, it is a good idea to create a template.
Example
<?xml version="1.0" encoding="iso-8859-1" ?>

<Templates>

 <Template title="Table whose parameters are set by Automne.">

  <Description>This is an example of a table set by Automne.</Description>

    <Html>

     <![CDATA[

      <table class="CMS_table" cellpadding="2" cellspacing="1" border="0">

        <tr>

          <th class="CMS_th">header</th>

          <th class="CMS_th">header</th>

          <th class="CMS_th">header</th>

          <th class="CMS_th">header</th>

        </tr>

        <tr>

          <td class="CMS_td">cell</td>

          <td class="CMS_td">cell</td>

          <td class="CMS_td">cell</td>

          <td class="CMS_td">cell</td>

        </tr>

      </table>

     ]]>

    </Html>

  </Template>

</Templates>
Here we have created a template called “Table whose parameters are set by Automne” and for which we want to display the description: “This is an example of a table set by Automne.”
We next define the basic HTML which will be available.
For more information about creating a template file, please consult the official documentation of the FCK Editor.
Other CSS files are classic and are used either for your page models or your modules. For the CSS module files, it is possible to let Automne automatically manage loading them.
For this it is sufficient to put in the /css/modules directory a file having the codename of your module. For example, for the contact module (codename pcontact) the file will be named pcontact.css. You can even specify the types of peripherals to which your CSS file is addressed.
For example, for a contact module you want to have a file destined for printing; you only have to add a sheet named pcontact-print.css to the directory.
Currently supported devices
- print : printing
- screen : display on the screen
For the module style sheets, the sheets do not specify the devices to be considered before loading. In the example with the pcontact file, the sheet pcontact.css will be loaded as intended for all devices and the pcontact-print.css sheet will be loaded will be loaded as intended for printing.
<atm-css-tags> tag
n page models it is possible to load your style sheets via the
Exemple d'utilisation :
<html>

    <head>

        <atm-css-tags files="/css/common.css,/css/internal.css" media="all" />

        <atm-css-tags files="/css/print.css" media="print" />

    </head>

    <body></body>

</html>


 French