It would be long and very complex to describe all the features offered, we will for the moment take a concrete example of a module to explain how it works. It is next possible to adapt it to your real needs to create your own application. For this example, we are going to create a module for document management which is a little simpler than the Media library inside the Automne demo.
ATTENTION : Some operations cannot be modified once performed. Likewise, a module cannot be deleted once created. It is thus preferable to use a demo version of Automne to make tests rather than beginning to create your module directly on a site already online.
The document management module manages files in Word, PDF, etc. throughout your site. It allows you to categorize these files as you want, to associate rights with them (of viewing or modification) and to have a central point from which to control all the files available on your site wherever you use them.
Creating a module
In the section “Administration > Module management” click on “New”.
You can thus add a new application. Give a name to this application as an identifier (codename). This identifier will be used by Automne to give your module a unique designation. It must there not already have been used. Consider it well because it cannot be changed afterwards. We will create a module having pdocs as an identifier (“p” is for Polymod and then docs for “documents”) and for a name “Document management”.
Creating the structure of objects
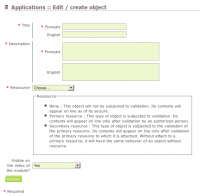
Once created, the module awaits its component objects. An object acts as a receptacle for the elementary fields that we spoke about above. Each object has a name, a description and a resource status (see the explanation of the relevant Automne page). Other options are available for these objects but we'll go into more detail later.
>For our example we only need one kind of object: the object "document" that will store the file and a set of meta data for this file. This object is of type "primary resource" because we want its contents to be revealed online only after it is validated by a user with appropriate privileges (of course this is defined according to your needs). Being a primary resource makes the objects automatically have publication dates that may be useful for publishing or un-publishing documents at specific dates.
It is thus necessary to define precisely what elementary fields our “Document†object will be composed of.
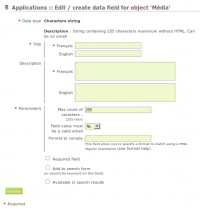
Let's start with its title. We will create a new field and select from the drop-down list what type of element will be used for this field. Here, a "string" field seems appropriate because we want to have a simple labelling of the document without formatting. Following this choice, a form appears, allowing you to precisely define the field: title, description (optional) followed by parameters specific to the field defined (maximum length: 255 characters and verification of email that in other cases to verify that the value entered is a valid email). Finally, three check boxes to specify custom options for the field:
- It is required? In the case of a title we can assume inputting it is necessary.
- Add a search form. In the module administration, one can use this field when searching by keyword or propose a drop-down list for compound objects. In this case, this box is checked because the title is a factor to take into account in a search.
- Visible in the search results. This parameter defines the important fields that you want to see in the results of the search you do in your documents in the module administration. The title is necessarily the first field visible, thus it is useless to check this box.
Once these parameters are selected, validate the creation of your field to continue.
Attention : All the parameters of an object are modifiable later except the type; choose them well when creating an object.
After the title, we will create four supplementary fields:
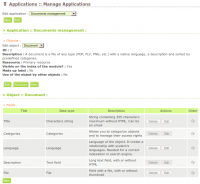
- A category field, to categorize the different files managed by the module. Two important options for this type of field: multiple categories (can combine one or more category for our file), in several categories for the same document appears justified. The category of highest level specifies (once the categories are created in the administration of the module) to select one as the root for this field. This can be very useful in cases where there are several category fields for the same object.
- A language field (can be omitted in the case where more than one language is not one of your needs).
- A description field in plain text (with HTML formatting) will more accurately describe the document.
- Finally the file field itself which will import the Word file, PDF, etc...to be associated with the document object that we created.
Managing documents, module administration
After creating the structure of individual objects is complete, you can start entering the content of the module through the list of applications in the same way as any existing module.
The administration of the module is built automatically based on the structure of the various objects you have created
If necessary, enter a set of categories (think following the creation of the first category to give yourself access rights to that category in your profile) then you can create / search / edit / delete / validate your objects on the administration side of the site. If necessary you can edit the properties of your objects if certain details need to be refined.
It is also possible to add fields if some appear missing. You can also delete fields.
Attention : By deleting a field you lose all the data already input for this field.
When you find that the administrative side of the module is suitable for your needs, you can think about how you want to display the information provided by the module on the public side of your site.
Public side module display
3 possibilities are available for you to display your data coming from the module on the public site managed by Automne.
- Creating content rows :
A row of content is the easiest and most complete and flexible way to insert the module content in your site. Indeed, this way you can fully specify the display of the content and the search engine if necessary. - Creating a plug-in for the visual editor (WYSIWYG) :
A plug-in for the visual editor (WYSIWYG) lets you insert in your text formatted one or more elements from the module while maintaining a connection between the module and its display: deletion, expiration of dates of publication or the lack of rights for the object will automatically disappear from the place where you have inserted them, to be replaced by what you want (explanation text or nothing at all) - Creating an RSS feed :
A feed is generally complementary to one of the two display methods cited above. Your users can simply follow the addition of new content for a given module (e.g. a news or blog module).
Of course these three methods of display are complementary and it is quite possible to combine with another for a given module.
In this example we created a content row for the documentation module. But the two other methods of display (plug-in for the visual editor and RSS feed) follow the same principles and the Autumn demo presents two examples of plug-ins for the Visual Editor for the module "Document Management" and an example of an RSS feed for the "News" module. Do not hesitate to consult the demo or ask questions about it on the forum.
Creating a content row
In order to create a content row, go to the Models section of Automne and then to the Row library tab. Creating a new row will open a text box where you can create your necessary XHTML / XML code.
It's necessary to master XTHML and CSS in order to correctly create a content row for your site.
Type a name for your row that reflects its use. For example if we create a search engine to view the various documents of the module, the name might be "Document Management: Search".
It is important to understand the concepts necessary to create a row. A number of steps must be carried out as you go.
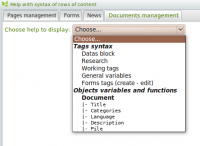
To begin, all the XML tags available for a module are detailed below the row input area.
This dynamic help lists all the different elements that you can use depending on the structure you've given the module.
From the module help, select "Data Blocks" and you get the details on the tag <block> which must contain all the tags in your module (a row can accommodate the blocks of several different modules) . You must start your row with this tag before any other.
In this tag, we will then encode a form that will be used to search the documents module. At this level, you can enter a simple XHTML form containing a text field (for searching by keywords) followed by a drop-down list in order to select documents by category; to conclude our form and we will, of course, add a validation button.
The code now looks something like this:
<row>

    <block module="pdocs" id="docssearch"       language="en">

        <div       id="docssearch">

                  <form action="" method="get">

                      <h3>Search documents :       </h3>

                      <label for="keyword">Keywords : </label><br /><input type="text"       id="keyword" name="keyword" value="" /><br />

                      <label for="cat">Category :       </label><br />

                      <select id="cat" name="cat">

                          <option value="">       </option>

                      </select>

                      <br /><br />

                      <input type="submit" class="button"       name="search" value="Search" />

                  </form>

        </div>

    </block>

</row>
Now we have to specify on what address the form should appear; in our case we want it to display the same page. In Help, see the "general variables" where you will find the syntax of variables on the pages.
All variables relating to the environment or objects that you manipulate are surrounded by two braces.
In our case we want to have the address of the current page in the action attribute of the tag <form> which translates as {page:self:url}.
We also hope that the form keeps the data that have been entered for the search when it redisplays. In the text field we will fill-in the value attribute with the variable (request: string: keyword). Finally, we hope that the tag <select> displays all categories relating to documents. To do this, we will select the field "Category" belonging to the object "document" from the help. We get here all variables and functions available for that particular field. One of the functions available is specifically tailored to fulfil this need: the function selectOptions.
The form now looks like this:
<row>

    <block module="pdocs" id="docssearch"       language="en">

        <div       id="docssearch">

                  <form action="{page:self:url}" method="get">

                      <h3>Search for documents :       </h3>

                      <label for="keyword">Keywords : </label><br /><input type="text"       id="keyword" name="keyword" value="{request:string:keyword}"       /><br />

                      <label for="cat">Category :       </label><br />

                      <select id="cat" name="cat">

                          <option value="">       </option>

                          <atm-function       function="selectOptions" object="{Document:Categories}"       selected="{request:int:cat}">

                      </select>

                      <br /><br />

                      <input type="submit" class="button"       name="search" value="Search" />

                  </form>

        </div>

    </block>

</row>
Once the search form is prepared, one must now retrieve and interpret the values it sends, search for this data and display the results.
To do so, we will create a search engine. The concept of research is very important in creating a row. Indeed, most of the operations of displaying module elements consist of searching for them with a certain number of criteria for the modules is to display them in a certain way.
How to correctly understand this research? Consider a simple example: Imagine a potato field. This field is composed of hundreds of different forms of potatoes, category, weight, size, shape, etc.. You want to search in this field for potatoes that meet a number of criteria.
Our search will thus be done in the following manner:
- 1.We are looking for potatoes
- We want these potatoes to meet the following criteria:
- A given size
- A given shape
- For all the potatoes meeting the above requirements, we want to organize the results by size in ascending order.
- Finally, we want to have the first 30 potatoes meeting these criteria.
In summary, a search is made up of three steps:
- Define what is being looked for,
- Define a collection of criteria to respect for the results,
- Define how to present these results (order and number of results to return).
Now back to our original example: a search for documents. In this example, we are going to search for documents and filter by keyword and / or by category.
To do this, in Help, see "Search" and you will find the syntax of different tags related to this task. We begin by defining a new search and therein specifying the two limiting criteria coming from the form created above. This gives us a code like this:
<atm-search what="{Document}"       name="docsresult">

    <atm-search-param search="docsresult"       type="{Document:Categories:fieldID}"       value="{request:int:cat}" mandatory="false" />

    <atm-search-param search="docsresult"       type="keywords" value="{request:string:keyword}"       mandatory="false" />

    <atm-result       search="docsresult">

        ...

    </atm-result>

    <atm-noresult       search="docsresult">

        ...

    </atm-noresult>

</atm-search>
The tag <atm-search> defines the search; tags <atm-search-param> define the filters (optional) to apply to this research; and tags <atm-result> and <atm-noresult> define respectively displaying results and the display in case there is no result.
Regarding the display of the results. The tag <atm-result> will be read for each result found by the search. Therefore in this one tag must detail the appearance of the display of a document using classic XHTML formatting, tags such as "Work" to specify rules particular to the result to display as variables of document fields. This can give us the following code:
<div       class="title">{Document:formatedDateStart|d/m/Y} -       {Document:label}</div>

<div class="cat">

    <atm-loop       on="{Document:Categories:values}">

        <a       href="{page:self:url}?cat={Document:Categories:values:id}"       title="See all documents from this category'{Document:Categories:values:label}'">{Document:Categories:values:label}</a>

        <atm-if       what="!{lastloop}">, </atm-if>

    </atm-loop>

</div>

<atm-if       what="{Document:Description:value}">{Document:Description:value}</atm-if>

<atm-if what="{Document:Fichier:fileIcon}"><img       src="{Document:Fichier:fileIcon}"       alt="{Document:Fichier:fileExtension}"       title="{Document:Fichier:fileExtension}" />       </atm-if>{Document:Fichier:fileHTML} -       {Document:Fichier:fileSize}Mo

<hr />
Note the tag <atm-loop> displays the different categories of documents as well as a link to used to search again within this category of documents. Also note that using <atm-if> verifies the presence of a file type before displaying an icon associated with said file type). Ditto for displaying the document description.
The row is practically finished; we must now add:
- A message in the tag
to specify that no results were found:
<atm-noresult search="docsresult">No result for this search...</atm-noresult>
- The display of the number of results found before displaying the first result:
<atm-if what="{firstresult}">{maxresults} result(s) for your search</atm-if>
- A system of pagination of results to display after the last result of the page :
<atm-if what="{lastresult}">
<div class="pages">
<atm-function function="pages" maxpages="{maxpages}" currentpage="{currentpage}" displayedpage="5">
<pages><a href="{page:self:url}?cat={request:int:cat}&keyword={request:string:keyword}&page={n}">{n}</a> </pages>
<currentpage><strong>{n}</strong> </currentpage>
<previous><a href="{page:self:url}?cat={request:int:cat}&keyword={request:string:keyword}&page={n}"><</a> </previous>
<next><a href="{page:self:url}?cat={request:int:cat}&keyword={request:string:keyword}&page={n}">></a> </next>
</atm-function>
</div>
</atm-if>
For this pagination to be correctly taken into account by the search engine, it must be added just before the tag
<atm-search-limit       search="docsresult" value="10" />

<atm-search-page search="docsresult"       value="{request:int:page}" />
Once all wrapped together, we obtain the foloowing code for the documents row :
<row>
<block module="pdocs" id="docssearch" language="en">
<!--Search form-->
<div id="docssearch">
<form action="{page:self:url}" method="get">
<h3>Search des documents : </h3>
<label for="keyword">Keywords : </label><br /><input type="text" id="keyword" name="keyword" value="{request:string:keyword}" /><br />
<label for="cat">Category : </label><br />
<select id="cat" name="cat">
<option value=""> </option>
<atm-function function="selectOptions" object="{Document:Categories}" selected="{request:int:cat}">
</select>
<br /><br />
<input type="submit" class="button" name="search" value="Search" />
</form>
</div>
<!--Search documents-->
<div id="docsresult">
<atm-search what="{Document}" name="docsresult">
<!--Search Filters-->
<atm-search-param search="docsresult" type="{Document:Categories:fieldID}" value="{request:int:cat}" mandatory="false" />
<atm-search-param search="docsresult" type="keywords" value="{request:string:keyword}" mandatory="false" />
<!--Results per pages and page to search-->
<atm-search-limit search="docsresult" value="10" />
<atm-search-page search="docsresult" value="{request:int:page}" />
<!--Displaying results-->
<atm-result search="docsresult">
<!--Display results number on first result-->
<atm-if what="{firstresult}">{maxresults} result(s) for your search</atm-if>
<!--Display a result-->
<div class="title">{Document:formatedDateStart|d/m/Y} - {Document:label}</div>
<div class="cat">
<atm-loop on="{Document:Categories:values}">
<a href="{page:self:url}?cat={Document:Categories:values:id}" title="See all documentsfrom the '{Document:Categories:values:label}' category">{Document:Categories:values:label}</a>
<atm-if what="!{lastloop}">, </atm-if>
</atm-loop>
</div>
<atm-if what="{Document:Description:value}">{Document:Description:value}</atm-if>
<atm-if what="{Document:Fichier:fileIcon}"><img src="{Document:Fichier:fileIcon}" alt="{Document:Fichier:fileExtension}" title="{Document:Fichier:fileExtension}" /> </atm-if>{Document:Fichier:fileHTML} - {Document:Fichier:fileSize}Mo
<hr />
<!--Display pagination on last result-->
<atm-if what="{lastresult}">
<div class="pages">
<atm-function function="pages" maxpages="{maxpages}" currentpage="{currentpage}" displayedpage="5">
<pages><a href="{page:self:url}?cat={request:int:cat}&keyword={request:string:keyword}&page={n}">{n}</a> </pages>
<currentpage><strong>{n}</strong> </currentpage>
<previous><a href="{page:self:url}?cat={request:int:cat}&keyword={request:string:keyword}&page={n}"><</a> </previous>
<next><a href="{page:self:url}?cat={request:int:cat}&keyword={request:string:keyword}&page={n}">></a> </next>
</atm-function>
</div>
</atm-if>
</atm-result>
<!--No results to display-->
<atm-noresult search="docsresult">No result found for your search ...</atm-noresult>
</atm-search>
</div>
</block>
</row>
And you can change this row in the manner that best meets your needs. You can also - as in the demo – split this into two separate rows (one part “search form” and the other "display results") to suit a particular layout.
Conclusion
This example could be more detailed but the main concepts of the system are described above. You will find in the next section of this documentation a set of usage examples that we have helped to put in place on other websites. This will allow you to have a better overview of the capabilities of this tool. The forum is at your disposal for any help request, advice or if you notice any mistakes.


 French
Add a contribution